Connecting to Amazon Redshift
Amazon Redshift is a fast, fully managed, petabyte-scale data warehouse solution that makes it simple and cost-effective to efficiently analyze all of your data using your existing business intelligence tools
If you want to give Redshift a go, you're in luck. They have a free-trial that is live for upto two months.
Step 1: Create Redshift credentials
Step 1a: Launch Cluster
Navigate to the Redshift resource page and click on the "Launch Cluster" button:

Step 1b: Enter details
| Field | Description |
|---|---|
| Cluster Identifier | You may call your cluster whatever you'd like. This is used as a simple way to identify the cluster within the AWS interface |
| Database Name | If you don't enter in a name for your database, it will default to "dev." This is easily found later in the AWS interface. |
| Database Port | Leave this number as the default value provided. In this case, it's 5439. This is easily found later in the AWS interface. |
| Master User Name | Enter a name in this field to create your Master User. This is easily found later in the AWS interface. |
| Master User Password | Enter a value in this field to create a password for your Master User. |
Step 1c: Configure your Redshift node
- Node Type: "DC" and "DS" stand for "Dense Compute" and "Dense Storage" respectively. The numbers that follow correspond to amount of memory and storage Available. You'll want "DC," as "DS" is only necessary if you anticipate scaling to over a petabyte (1M GB) of data.
- "DC1.Large" will allow for 15 GiB and 160 GB SSD per node, which is more than sufficient to get set up initially. If necessary, you can always easily resize your cluster retroactively.
- For details on pricing of nodes, visit this pricing page.
- Cluster Type: Single node is sufficient for most users. Multi-node configurations may be necessary later on if you have many end-users querying your Redshift data warehouse at once. This can also be changed retroactively.
Step 1d: Additional configuration
On this screen you can set additional configuration options:
| Configuration | Explanation |
|---|---|
| Encrypt Database | This option is entirely up to your organization's compliance standards, and it has no bearing on Silota's integration process. You may check either KMS or HSM, and the Redshift configuration will provide further instructions. |
| Choose a VPC | A default VPC is provided, though you may choose whichever you like if your organization already has additional VPCs configured. |
| Cluster Subnet Group | Leave this as default or choose another option if you'd like. |
| Publicly Accessible | Set this to "Yes". Silota needs to be able to connect to your Redshift cluster in order to execute queries on it. |
| Choose a Public IP Address | You may leave this as "no" unless you already have an IP address configured. This option will not appear if you did not make your cluster publicly accessible. |
| Availability Zone | This is entirely up to an organization's preference. |
| VPC Security Groups | You may associate your cluster with any security group you'd like. |
| Create a CloudWatch Alarm | If you'd like, you may create an alarm to notify you if and when you need to resize your cluster. |
| Creation of IAM Roles | This is not necessary at this time. |
Step 1e: Review
On the final screen, you can review you configuration options before heading over to creating your cluster. You now just have to wait – it can take anywhere from 10 to 15 minutes.
Step 2: Upload credentials to Silota
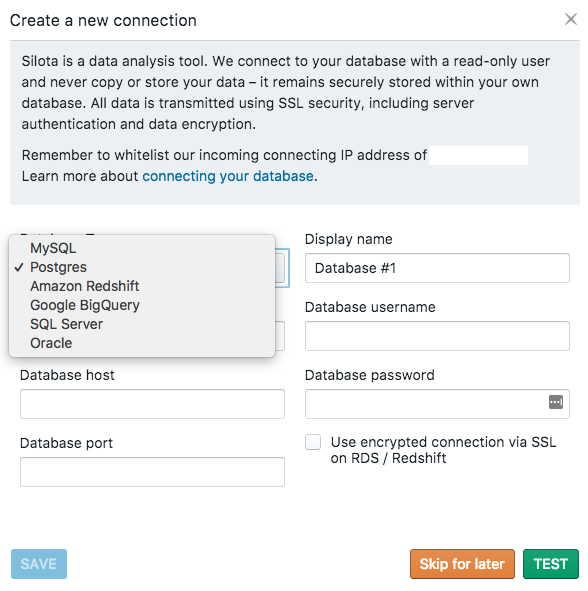
If you're able to succesfully test your connection to the cluster, you can save the connection settings and you're on your way!
Resources
 Onboarding forward-thinking teams now:
No spam, ever! Unsubscribe any time. Learn more about the product.