SQL databases can use a MERGE or UPSERT statement to insert new records or update existing records depending on whether the new data exists in the database. Though this feature is part of the SQL standard, unfortunately, Redshift does not support it. You can still achieve the UPSERT feature using this trick.
1. What is Upsert?
UPSERT is a magic trick where an INSERT converts itself into an update if a row already exists with the provided primary key. Postgres, and by extension Redshift (which based on an old version of Postgres) hasn’t had UPSERT functionality until recently. This feature gap is something that caused a lot of contention amongst Postgres fans.
As Redshift is based off an older version of Postgres, it still has no UPSERT functionality. It doesn’t really matter – as we’ll shortly see. This method works wonders if you want to completely replace all the columns in the destination table.
2. Defining what we need
To perform UPSERTs on Redshift, we’ll make use of a staging table. To define the ingredients, we’ll need:
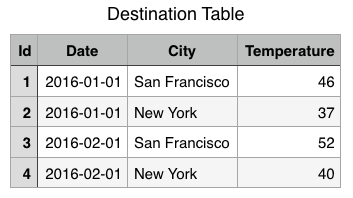
2a. The destination table:
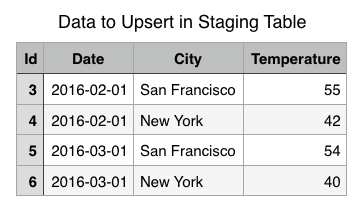
2b. A staging table with the new data:
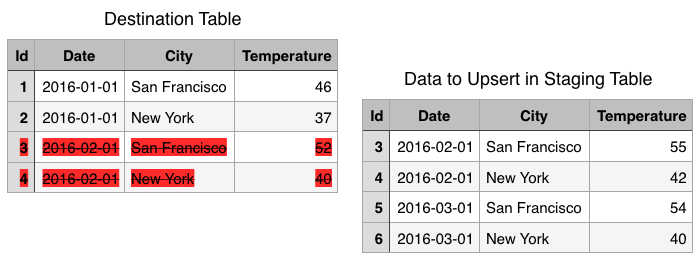
2c. The destination table and staging table side-by-side:
2d. The final destination table after merge:
3. SQL code to do the upsert
Step1: Create the Staging table
You’ll need to create a staging table with exactly the same schema as the destination table:
CREATE TABLE "schema"."staging" (
  Id integer not null primary key,
  Date date,
  City varchar(32),
  Temperature integer
);
Step 2: Upload to Staging table
Use this COPY statement tip from our previous article on getting starting with Redshift:
COPY "schema"."staging"
  FROM 's3://<bucket_name>/<object_name>.csv.gz'
  CREDENTIALS
    'aws_access_key_id=<aws_access_key>;
     aws_secret_access_key=<aws_secret_access_key>'
  REGION 'us-west-1'
  DELIMITER ','
  GZIP;
Step 3: Delete conflicting rows from destination table
Find rows in the destination table that have a conflicting primary key with the new data uploaded to the staging table and delete them using an inner join:
DELETE FROM "schema"."destination"
  USING "schema"."staging"
  WHERE "destination"."Id" = "staging"."Id";
In the figure below, we’ve highlighted and crossed out the conflicting rows in the destination table that are conflicting with the staging table.
Step 4: Insert rows from the staging table
Now that all conflicting rows from the destination table have been removed, you can insert the rows from the staging table without the risk of a duplicate primary key.
INSERT INTO "schema"."destination"
  SELECT * FROM "schema"."staging";
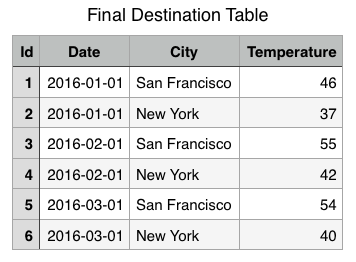
Your final destination table should look something like this:
End Notes
This trick to make Redshift perform UPSERTs is quite neat!
Two more notes:
- Make sure you re-balance your cluster after the UPSERT operation as the data distribution might have changed and your queries will start to run slow.
- Make sure you wrap the entire operation in a transaction, so that you can roll back in case of any errors.